Showing posts with label distressed. Show all posts

Friday, August 12, 2011

Before & After

My latest project has been a small white shelf. Here it is before I got a hold of it.

jewelrey holder and shelf 002

Actually I had gotten a hold of it. I filled in two holes with wood filler. Anyways here it is After:

wall shelf 006

I wanted this shelf to look like it had been weathered by the salt water of the Gulf. I wanted chippy paint, blues and grays, and nautical knobs. What do you think? Here’s the top:

wall shelf 001

And here is a close up of the knobs:

wall shelf 009

Don’t you just love them!?! Thanks Hobby Lobby for your amazing collection of knobs. Who would have ever known? I think this is going to look right at home in our master bedroom, which of course will be nautical themed, but I might sell it for the right price… :)

Cheers!

Sunday, July 17, 2011

Cheapest Way to Re-Upholster!

This post is LONG over due! I’m finally catching up with some of the recent projects I’ve been over taking. If you remember back in this post I started refinishing my super old chair my Paw-Paw gave me. I’ve always loved the chair, but it has never matched anything in my house. I want this chair to go in my bedroom, which will be painted light blue/gray. I needed a fun pop of color so this is what I came up with:

projects 006-2

Here is a quick before:

chair makeover 002-2

The texture of the upholstery was a crushed velvet, now it is more like a smooth leather. I love the way the color turned out, but mostly I love the way the detail work turned out with the distressing.

projects 008chair makeover 009-2

So are you wondering how I turned my red baby blue? You can check out my other post and see where lately I’ve been mixing paint with fabric medium, that is exactly what I did here. I’m not a pro at recovering furniture and I just didn’t want to chance it, then I ran across this blog. Pure amazingness! I had NO idea this was possible! What do ya’ll think?

I’ll leave you with one last picture of my beautiful chair. And yes it is permanent, no it won’t crack, and no it won’t come off on your clothes even if you are wet.

Have you ever painted fabric?

Cheers!

projects 010

Wednesday, June 8, 2011

Some Women Shop ‘til they Drop, I Paint ‘til I Drop

I’m at it again, another painting project. This one is near and dear to my heart. I’m refinishing a VERY old chair my Paw-Paw gave to me. Honestly, he’s probably rolling over in his grave right now. My Maw-Maw told me that he used to fuss when he would hear about people painting antiques. Paw-Paw used to run an upholstery shop long ago. He gave each of his grandkids one item that he had reupholstered. This chair is my piece of furniture he gave me. I wish I knew its history or at least how old it is.

I’m not quite finished with this project, but I’m going to let you see what I’ve done already.

chair makeover 002-2

BEFORE

chair makeover 003-2

So I taped off around all the fabric, then took steel wool and lightly scratched up the wood. Next I sprayed the whole chair with primer to make my paint stick. I just use the cheapest acrylic primer I can get my hands on.

chair makeover 004

chair makeover 008-2

Here is the chair after three coats of Sherwin Williams Creamy in Semi-Gloss. I also used a faux glaze for my distressing, the color is Espresso Beans. I put the antiquing glaze on the cracks and crannies with a brush and then wiped it off with a wet towel. I also lightly sanded in places that I thought the chair would naturally wear down.

Check out this gorgeous detail.
chair makeover 009-2

I’m swooning over the tiny cracks in the woodwork. Isn’t it to die for!?! I think I did a much better job distressing on this piece.

chair makeover 010-2

Stay tuned. Hopefully tomorrow I will be showing you the cheapest way EVER to reupholster furniture.

Cheers!

Monday, June 6, 2011

I’m Distressed

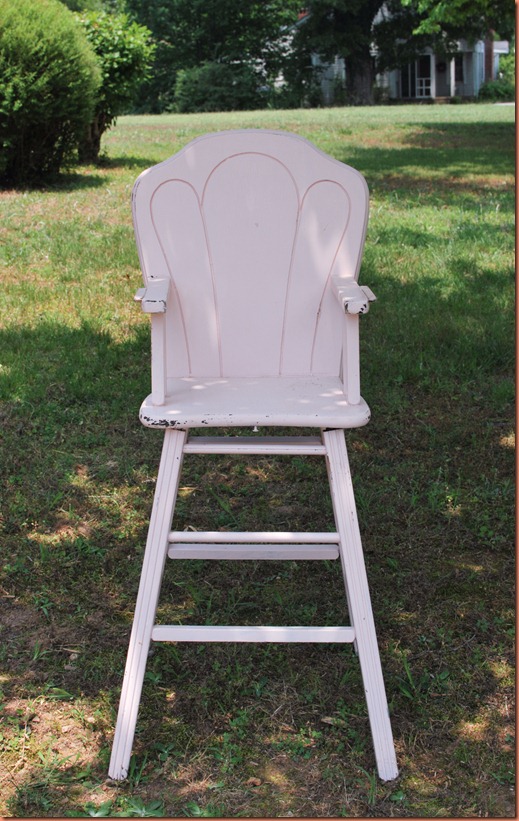
Not me silly, my highchair! Yes, I am 25 years old, and yes I still have a highchair. I have inherited my baby high chair, which was my mother’s before me, and my uncle’s before that; he is over 60 now. I lurv my high chair! I actually loved it more before my crazy ex-aunt lady ,not really related to me, took it and painted it PINK, yes that’s right, I said PINK! A hideous pink at that. It used to be in its natural dark wooden state, and I loved it. My highchair has a lot of cracks and crannies…(do those fit here)? Anyways, I was too lazy to strip it all down, so I sanded and then painted, and then distressed it. This was my first time distressing a piece, and I think I went a little crazy. These pics are of my high chair toned down. I actually went back and added a lot more distressing on the seat and the back, per advice from a friend. I can’t tell you how many times I painted, then distressed, then repainted, then resanded. I think I’m just gonna leave it. It looks like it has been given lots of love and usage throughout the years. Tell me what you think!
high chair 010-2

Before. I actually had started sanding before I took the shot.

high chair 025-2

AFTER. Please excuse our hideous floors. We ripped the linoleum up in hopes of restoring the original hardwoods, but as you can see they are in terrible shape. We have decided to save up our funds so we can afford some nice tile/slate for the kitchen and mudroom (since they are adjoining rooms).

high chair 031-2

The back and seat are much more distressed now…Should I have left it how it was? IDK! I barely distressed the tray, bec/ we might have a little one eating on it one day. BTW I used Olymipic no VOC paint. The color is Creamy by Sherwin Williams.

high chair 030-2

Seat detail. You can still see a little pink in the distress areas, I guess I can handle it in small amounts. :D It makes it look like it has been painted multiple times (which it has) and the paint is chipping. It is all actually very smooth. I sanded over the whole thing with 120 grit and then I finished it with wax finishing paste. This is what it looks like.

image

It is not suppose to yellow your white paint like polyurethane. It also protects with a water resistant finish. You just wipe it on with a rag, let dry for 10 to 15 minutes and then buff off with a clean rag, shines right up!