Showing posts with label before and after. Show all posts

Friday, August 12, 2011

Before & After

My latest project has been a small white shelf. Here it is before I got a hold of it.

jewelrey holder and shelf 002

Actually I had gotten a hold of it. I filled in two holes with wood filler. Anyways here it is After:

wall shelf 006

I wanted this shelf to look like it had been weathered by the salt water of the Gulf. I wanted chippy paint, blues and grays, and nautical knobs. What do you think? Here’s the top:

wall shelf 001

And here is a close up of the knobs:

wall shelf 009

Don’t you just love them!?! Thanks Hobby Lobby for your amazing collection of knobs. Who would have ever known? I think this is going to look right at home in our master bedroom, which of course will be nautical themed, but I might sell it for the right price… :)

Cheers!

Wednesday, July 20, 2011

Where Have YOU Been?

I’m just kidding, it’s me that has been gone. We have been offline and outta touch since Monday when our living room remodel started. I don’t have a final picture for you, because we are still moving furniture back in and unpacking, but I thought I’d fill you in on the progress.

First, let’s look at the living room on the day we moved in, shall we.

DSC_0030DSC_0031

The floors were in bad shape. The room all the way in the back in the left picture used to be a screened in porch. Apparently before we got there it had carpet and then that was ripped up to reveal unfinished wood. We sanded the whole floor as best we could you can read about that here. We then stained it Bombay Mahogany by Cabot and laid down two coats of poly. We have also closed in that closet, you can read about that here. This week we hired a crew to come and patch the cracks in the wall and to texture our ceiling. It was such a big project because they had to hang new sheet rock over the old and then texture. Our living room is really long and it took 14 pieces of sheet rock. Needless to say, we are holding off on other big redo's, until we recuperate, or until our pocketbooks recuperate. ( Do people say pocketbooks anymore? If you don’t know what it is, ask your grandma). After the ceiling was textured we called in a favor to a great friend and neighbor who happens to be a professional painter! Boy did he help us out! We couldn’t have done it without you Dan! Here are some pictures of the progress.

living room 001

The walls after they had been patched.

living room 004

Ceiling with new drywall and texture. It’s called Brocade. This is what it looks like before paint. I almost flipped when they said they were done and it looked like this! hehe Here is what it looked like after two coats of Glidden Antique White (that we got at Wal-Mart for $9 a gallon reg. $23 a gallon).

living room 018

This picture is kinda dark, but you get the idea! We love it!

living room 005living room 006

Jeff priming the walls.

living room 008

Me, adding some color: Wedgewood Gray by Benjamin Moore, mixed in Olympic paint.

living room 012

You can tell how hard and fast I’ve been working. lol

You may remember this hole (only if you’ve heard the story or been in our house). It came from rocking too hard.

bathroom storage 004

Now it only exist in our memories.

living room 014

living room 016living room 017

This picture on the left is probably the most accurate color wise. I thought the color would be more gray, but it actually looks more blue. We still love it! With the antique white ceiling, super white glossy trim, and dark shiny floors it has a strong beach vibe (which isn’t what we were going for, but we’ll take it)!

Here it is with the dirty floor.

living room 019

Obviously these aren’t the finished product, but it might be a few days before you see the whole thing put together (minus normal furniture, our couch is a futon right now).

Cheers!

Sunday, July 17, 2011

Cheapest Way to Re-Upholster!

This post is LONG over due! I’m finally catching up with some of the recent projects I’ve been over taking. If you remember back in this post I started refinishing my super old chair my Paw-Paw gave me. I’ve always loved the chair, but it has never matched anything in my house. I want this chair to go in my bedroom, which will be painted light blue/gray. I needed a fun pop of color so this is what I came up with:

projects 006-2

Here is a quick before:

chair makeover 002-2

The texture of the upholstery was a crushed velvet, now it is more like a smooth leather. I love the way the color turned out, but mostly I love the way the detail work turned out with the distressing.

projects 008chair makeover 009-2

So are you wondering how I turned my red baby blue? You can check out my other post and see where lately I’ve been mixing paint with fabric medium, that is exactly what I did here. I’m not a pro at recovering furniture and I just didn’t want to chance it, then I ran across this blog. Pure amazingness! I had NO idea this was possible! What do ya’ll think?

I’ll leave you with one last picture of my beautiful chair. And yes it is permanent, no it won’t crack, and no it won’t come off on your clothes even if you are wet.

Have you ever painted fabric?

Cheers!

projects 010

Monday, July 11, 2011

From Retro to Rockin’

It’s been too long since I’ve been here. Jeff and I have been extremely busy this summer and I have neglected you all!

A while back I bought these chairs on the cheap from a thrift store near town. I saw potential for them in my dining room. Since I want an eclectic dining room I thought these chairs would look great with my other two wooden ones, that ya’ll haven’t seen yet.

So, without further adieu’ here they are:

high chair 004

This is what they looked like when I purchased them from a thrift store. Yes, I know there is one in the picture, but the other one looked just the same. Trust me.

So, I started to take the seat off of my new/old chairs so I could spray paint the frame and the seat totally fell apart. For those of you interested the bottom of my old chair seat said: The Duchess Line, Aristocrat of Dinettes. Manufactured By: Gate City Table Co. Inc, Atlanta, GA. I thought that was super cool. I have yet to researched the company and maybe trace back the dates of these chairs.

I spray painted the frame Heirloom White by Rustoleum. Next, my amazingly handy hubby cut me new seat bases out of 3/8 inch plywood, by tracing the old seat and then using a jigsaw to cut them out.
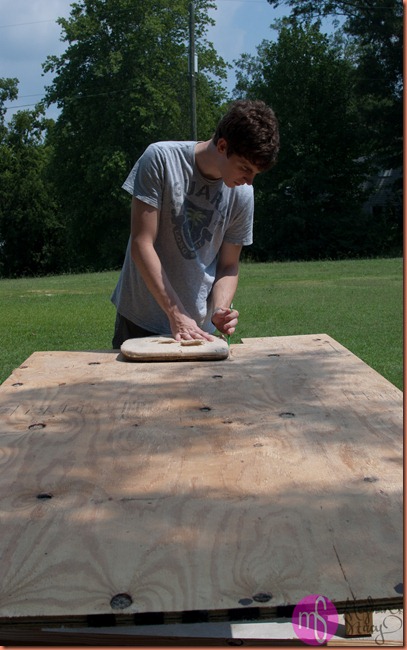
chairs and vintage toys 001

chairs and vintage toys 012

Then it was time to make those hard boards soft. I purchased foam squares from Wal-Mart.

chairs and vintage toys 033

You are going to need to traced the foam and then cut it. Then you will need quilt batting. I got extra loft so it would be plusher, since it is for a seat. You need to flip the seat over with the foam under the board and then cut around it (about five inches extra on all four sides). I always make sure to overestimate on this part because it’s okay to have extra, but if you don’t have enough batting or fabric you are out of luck!
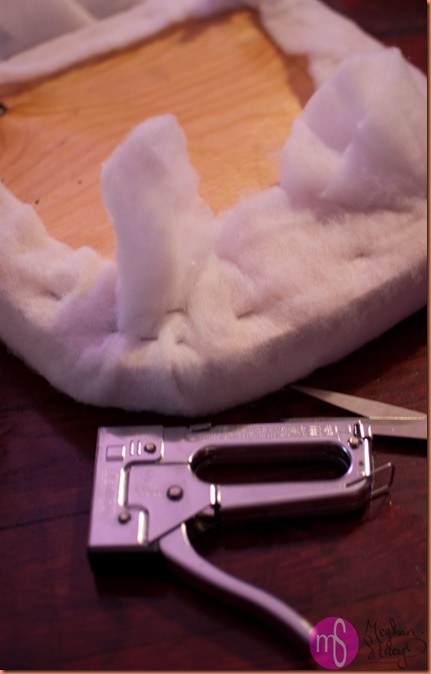
chairs and vintage toys 034

Next, staple all the way around. I start on one side and pull it tight, then I go directly across the side I just finished and pull it tight and staple. I continue this idea all the way around to keep it tight. Lastly I staple the corners. I’m not to great at that yet. After I’m finished stapling I cut the extra loose batting.
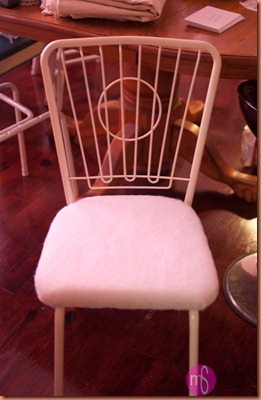
chairs and vintage toys 035

Chair seat with just batting. This is what your seat should look like flipped over.

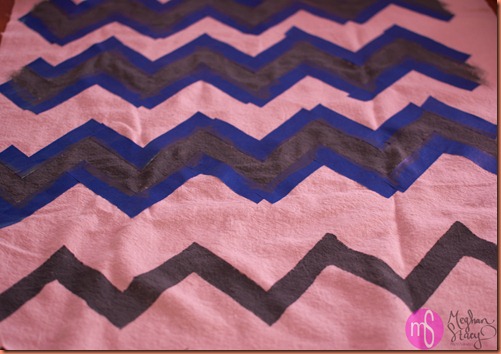
For my fabric I wanted to use canvas drop cloth. It’s a sturdy, durable, material. I bleached mine out. I also wanted to create a chevron pattern, so I found one online and printed it out, then cut it. You should lay it where you would like it on the fabric (if you want to try to recreate this), then pin it down. Next, take painter’s tape and go around the pattern (see picture below).

chairs and vintage toys 036

To paint your fabric you need to mix two parts acrylic paint with one parts fabric medium. You can buy fabric medium at Hobby Lobby. I use it all the time. This makes the paint permanent. You just mix, paint, heat set with a blow-dryer. You can wash the fabric after 7 days. The paint will not come off even if it gets wet.

The next step after you get all your tape on is to remove the pattern and paint in the space.
chairs and vintage toys 037

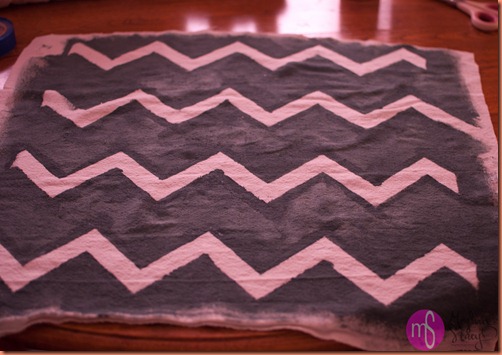
To paint the negative space, you can just leave the pattern pinned down and then paint the canvas around. You don’t get as crisp of lines, but it still looks pretty good.
chairs and vintage toys 038

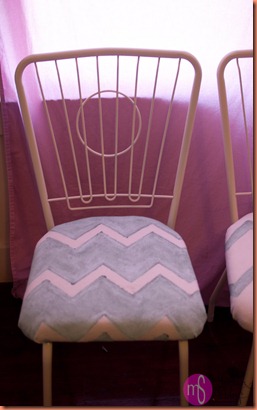
After my canvas was all dry I decided I wasn’t happy with the color I had chosen. It just seemed to dark for our house. I decided to take a lighter blue and mix with the medium and paint over by hand with a small brush. Here’s the final product:

chairs and vintage toys 003

chairs and vintage toys 005

high chair 004chairs and vintage toys 003

Before After

So there you have how to make your own base, cover your own seat, and how to design your own fabric! I hope you enjoyed this tutorial.

(Side note: if the above pictures have a pink hue, it’s not your eyes or your computer, it’s my dining room. I have a pink sheet hung over the window for privacy)

Cheers!

Monday, June 6, 2011

I’m Distressed

Not me silly, my highchair! Yes, I am 25 years old, and yes I still have a highchair. I have inherited my baby high chair, which was my mother’s before me, and my uncle’s before that; he is over 60 now. I lurv my high chair! I actually loved it more before my crazy ex-aunt lady ,not really related to me, took it and painted it PINK, yes that’s right, I said PINK! A hideous pink at that. It used to be in its natural dark wooden state, and I loved it. My highchair has a lot of cracks and crannies…(do those fit here)? Anyways, I was too lazy to strip it all down, so I sanded and then painted, and then distressed it. This was my first time distressing a piece, and I think I went a little crazy. These pics are of my high chair toned down. I actually went back and added a lot more distressing on the seat and the back, per advice from a friend. I can’t tell you how many times I painted, then distressed, then repainted, then resanded. I think I’m just gonna leave it. It looks like it has been given lots of love and usage throughout the years. Tell me what you think!

high chair 010-2

Before. I actually had started sanding before I took the shot.

high chair 025-2

AFTER. Please excuse our hideous floors. We ripped the linoleum up in hopes of restoring the original hardwoods, but as you can see they are in terrible shape. We have decided to save up our funds so we can afford some nice tile/slate for the kitchen and mudroom (since they are adjoining rooms).

high chair 031-2

The back and seat are much more distressed now…Should I have left it how it was? IDK! I barely distressed the tray, bec/ we might have a little one eating on it one day. BTW I used Olymipic no VOC paint. The color is Creamy by Sherwin Williams.

high chair 030-2

Seat detail. You can still see a little pink in the distress areas, I guess I can handle it in small amounts. :D It makes it look like it has been painted multiple times (which it has) and the paint is chipping. It is all actually very smooth. I sanded over the whole thing with 120 grit and then I finished it with wax finishing paste. This is what it looks like.

image

It is not suppose to yellow your white paint like polyurethane. It also protects with a water resistant finish. You just wipe it on with a rag, let dry for 10 to 15 minutes and then buff off with a clean rag, shines right up!

Saturday, May 28, 2011

They’re Done

I finished the rocking chairs a few days ago, but haven’t had time to blog. First, I sanded them, then I primed them with an oil based primer (kilz), then I painted them Sea Green (kilz), then I put a wax finish on them. The green is not as bright as an apple green, but I had this green left over from our old house, so it was FREE!

I made the pillows out of an old vintage table cloth that I bought at a thrift store that helps our local humane shelter. I actually just sewed 3 sides and then stuffed an old pillow in it and then sewed up the fourth. They aren't very pretty, but they sure do make the chair more comfy!

Now to the pictures…

rocking chair 001

rocking chairs 004rocking chair 002

Yesterday I started stripping the front screen door. I used a whole can of spray stripper and only got through the first 3 coats before I ran out. So, I need like 3 more cans! There isn’t much wood on the door, but there are so many layers of paint from the last 60 years, it is taking FOREVER! Hopefully in a few days I will have that project done. We chose an amazing Teal paint by Olympic. I can’t wait until it’s finished. I think it will look amazing with my sea green chairs!

Cheers, ya’ll!

Friday, May 7, 2010

Before & After

DSC_0003 (2)

This was my grandmother’s first dresser. She let my grandfather use it in his room, hence the blue color. After he passed, I inherited it. This is what it looks like now.

DSC_0009 (2)

Here is the little stool I made to go with it:

DSC_0003 (4)